FRETS.COM Repair Blog, September,
2010
Please click on the small images to see the large
views.
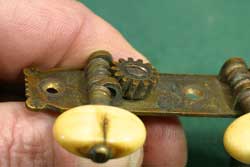
My challenge was to replace this bearing post without disturbing the cracked button or taking apart any more of the assembly than necessary:
I started by using my flush cutting end nippers to cut the protruding bit of the worm gear support rivet:
With the post and gear removed I was able to push out the bearing out, revealing the rectangular mounting hole:
Next I measured the diameter of the bearing area of the worm gear shaft so I could fabricate a new bearing:
After making a brass section with a long "foot" the same width as the length of the rectangular mounting slot, I drilled the length to the same diameter as the bearing, and rounded off the piece on the milling machine:
I'd made this part in a long section so I could slice it and have several identical sections. That way, I could experiment with my fitting technique, and not worry about messing up. I used a .010" slitting saw:
Here's my batch of little bearing blanks:
I sliced the foot of the bearing with that same slitting saw blade, splitting it right up to the hole:
After improving the shape by filing, I finished the part with 600 grit abrasive paper and buffed it to a high shine:
I knew I'd have to hammer the little rectangular tab to rivet the bearing onto the plate, so I spent some time making a little anvil to support the part so it wouldn't distort from the hammer blows. I used a piece of 1/4" hot rolled steel scrap and filed the shape to match the bearing:
Bending the bearing "open" so I could wrap it around the shaft put a fair strain on that brass, so I annealed it with my propane torch. The heating process also gave the brass a bit of an oxidized patina:
Once I had the bearing bent around the shaft and squeezed back into shape, I used regular soft solder to fill the saw kerf and solidifiy the piece:
With the bearing in my little shaped anvil, I was able to hammer away with my small ball pein to form the backside rivet:
Here's the completed assembly:
Rummaging around the shop, I found an old bottle of "cold bluing" solution I'd used to blacken some steel tool parts. I mopped a bit of that stuff on the new bearing, which turned nicely brown to match the old parts of the gear plate.
Drilling through the bridge, I reproduced the holes through the top and reamed them to suit the taper of the bridge pins:
I use a heavy, rigid setup with a laminate trimmer to rout the slot for the bridge saddle. Now, while I could do this operation in the process of actually making the bridge, I prefer to work as I usually do - on the completed guitar. This is the kind of technique that's more suited to the repairer who must often work with the intact instrument, while the builder would be more likely to make fully finished parts:
The router produced a slot with rounded ends, so I used a chisel to square them up as the original style:
In the process of final setup, I made an oversize "blank" saddle from a piece of old "estate ivory" I reserve for antique work:
The finished saddle fits the square ended slots, and hangs over the top just a bit for a nice visual effect:
Here's the finsihed bridge, strung and ready to do its job:
A final view of the completed project:
An oblique shot of the back:
The tuners, rebuilt and working nicely: