Bridge Making Day, continued -
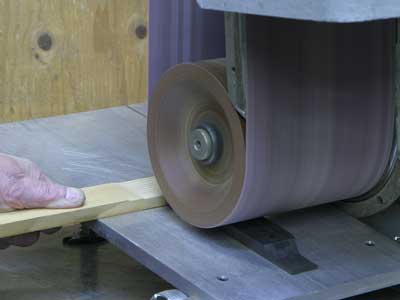
Both of our stationary belt sanders have adjustable tables beneath them for thicknessing small wood pieces. I used the big sander to bring the bridge down to .39" thick:
I'll get to the final thickness of 3/8" in the process of shaping and sanding the bridge.
By alternatly pressing on the ends of the bridge, I was able to create an appropriate curve for the top of the center section:
And, by offhand sanding on the 1 x 42 belt sander above the platen, I was able to take advantage of the flexibility of the running belt to establish the rough curved shape of the front and back of the center section:
This sander is set up with a variable speed DC motor drive, so I can slow it way down for special uses, such as this one.
Here's the final "machined" bridge:
That's the end of my power tool use, and from here out, I used flat and shaped sanding blocks to smooth, round, and create the curves to make the bridge look as though it came out of Martin's workshop in 1937:
As I worked on the bridge held in the vise, I had a nice original 1937 bridge balanced on the anvil section of the vise:
That's one more reason why we keep so much old junk in the shop. That bridge was a cracked but otherwise fully original one we took off a 1937 000-28 when we made a new replacement one. I glued the crack up, labeled the bridge, and stuck it in the box labeled, "Old Bridges for Patterns." In the restoration business, there's nothing like having the real thing in front of you when you need to copy something!
As I sanded and shaped the bridge, I'd walk over to the buffer and run the bridge against the soft wheel with black plastic polishing compount to give it a high shine:
It's a trick I use to check my progress and to make sure I've eliminated any tool marks or sanding scratches. Below, you can see the heavy belt sanding scratches on the center section, and a completed, smooth end:
Well, my new bridge is finished, and here it is between the original 1937 000-28 pattern I used for copying the contours, and, below, the original D-28 bridge I used to copy the exact footprint:Mine is a bit too shiny at this point, but it will loose a bit of that polish as I glue it to the guitar, and wash off the excess glue after the job is done.
The guitar top was in fine shape, so I had only a little block sanding to do to level th surface, and remove oxidation that might impair glue adhesion:
I masked the top with some very low tack tape so I wouldn't scratch any of the finish if I dragged the sandpaper past the margin where the bridge will go.
Incidentally, my favorite low tack tape is regular masking tape. I just stick it down to the towel pad on my bench, and it picks up enough dust to become low tack tape. Two stick-downs, and I have really low tack tape:Here's anothe new fixture in the shop. I'm still working on the design, so I'll call this "Mark 1" for now. It's a bar with adjustable fingers I can use to capture the bridge precisely in position prior to gluing:
There are lots of ways to position bridges for gluing, including pins or bolts that go through the holes, but I've found that none of those are completely foolproof, so I set about figuring a really solid way to hold the bridge.
Once I've established the front edge and clamped the fixture to the guitar, I simply slide bridge into exact position, bring in the fingers, tighten them up, and I'm certain that the bridge won't move at all when I'm applying clamping pressure: Here we go - a mop of fresh hot hide glue: Plop the bridge into the fixture, tighten the clamps, and that's it:Once the bridge is clamped, off comes the locating fixture, and I can easily clean up the squeeze-out with a bit of warm water and paper towel:
After the usual overnight clamping and cleanup, here's the bridge, awaiting further work - after the neck is set into the body:
There is a single original maple veneer shim inside the dovetail pocket, and you can see that it has the guitar's serial number written in pencil:
(I've obscured a few digits as a courtesy to the owner of this fine instrument.)
Because the shim is still tightly glued in place, I chose to leave it there rather than remove and replace it.
Another special tool I made up, this is a flush cutting saw that mounts in the milling machine:
I countersunk three flathead screws in the blade to secure it to the arbor, and because there's no set in the teeth, they hardly scratch the fingerboard as I use it to cut into the dovetail:
The reason for slotting the top of the dovetail is so that when the neck is tilted back and reglued in place, the end of the dovetail won't force the fifteenth fret area of the fingerboard to rise, creating a little hump there. Before I made this tool, I used a hacksaw blade, and struggled to avoid damaging the fingerboard. This method is not only much easier, but it gives a cleaner result.
Notice how the blade cuts neatly without damaging the fingerboard as it slices through the top of the steel truss rod and the dovetail itself:
This little gap will fill with glue as the neck is reset and reglued, and it will create no structural weakness in the area.
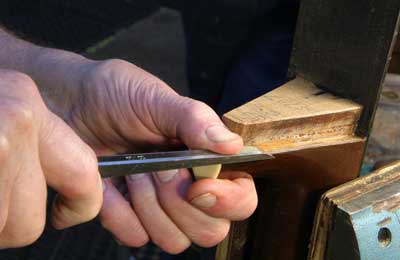
Most of the rest of the process of resetting is a matter of slowly cutting the dovetail joint - in particular the face of the end of the neck that contacts the body. I started with a bit of chisel work to rough cut the angle, and to undercut the area just a bit:
I did the final angle adjustment by drawing slips of abrasive paper through the joint as I held the neck against the body:
Since I wanted to bring the neck backward, the natural cutting action of the abrasive was more concentrated at the base of the heel. As I pulled the paper through, the entire length cut uniformly in a taper because the abrasive left the area at the top of the joint right away, while the bottom of the joint saw the full length of abrasive come through.
My abrasive paper isn't really paper, but Mylar film with 150 grit silicon carbide bonded to one side:
It's much stronger than paper, and the smooth Mylar surface is nice and slippery, so it's ideal for this job.
Each time I used up a couple of strips, I'd stop and check the angle with my straightedge, being sure to hold the neck firmly in the joint:
Rinse, repeat. . .
After a number of sandpaper pulling sessions, and constant checking with straightedge, I had the neck set at what I determined would be an appropriate angle in relation to the top of the bridge. In addition, I constantly checked for side-to-string alignment as well.
All this joint fitting would require some additional shims to tighten the dovetail, which now fit deeper into the pocket at the base of the heel, allowing the neck to tilt backward appropriately.
Trial fitting various shims, I decided on a thin maple shim on the bass side of the joint, and a tapered mahogany one on the treble. The two shims made the dovetail lock nice and tight as it was pressed downward into position:
Just for general interest, here's how I make those super thin tapered shims:
First, I true up a block of hardwood, either by hand planing or belt sanding one edge:
That edge will bear against the band saw fence, so I mark it so I don't forget which edge I've trued up. Then, I cut a bit of the other edge, so the block will have parallel edges:
Then, I take the freshly cut edge to the belt sander, and sand a slight angle into the block:
Back at the band saw, I reset the fence to start a cut as shallow as possible at the narrow end of the piece, and, riding on the fence, I can cut a nice slice off the tapered edge of the board:
The result is a nice tapered piece, paper thin at one end, and thicker at the other:
I make these shims ahead of need. They are so quick and easy to produce that I can have dozens of them with varying thickness and angles on hand when I'm looking to shim a joint.
A quick pass on some sandpaper gives the rough cut surface a nice truing up:
That's a band of masking tape, sticky side out, to improve my grip on the little slip of wood.
Now, just in case the photos above make it look like I might cut my thumb off with the band saw, here's how I like to handle pieces if my hand is to be between the blade and the fence. With my fingers wrapped around the other side of the fence, there's no possibility that my hand might slip toward the blade:
Painting some hide glue on the joint surfaces and shims, I put the neck joint and shims back together and clamped up with a caul on top to protect the fingerboard while allowing it to seat against the top of the guitar without flexing:
I used two clamps, not for the extra pressure, but so I'd have good clearance between the clamps and the neck so I could do one final check of the neck angle and side-to-side string alignment before setting it aside overnight for the glue to dry.
Here's s shot of that fingerboard clamping caul - it has two rails to press at the outward edges of the board, and is relieved to avoid pressing on frets:
This is anothe tool I made up in my home machine shop, and I use it for gluing on fingerboards as well as for neck resetting.
Another overnight drying episode before starting out on