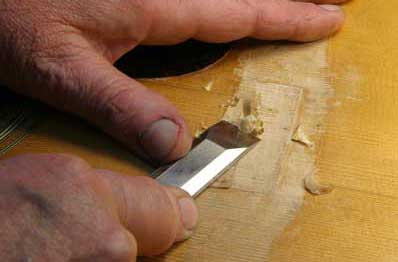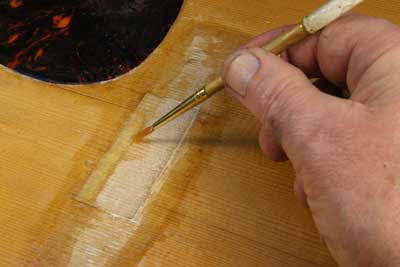

That bent chisel's back on the scene, slicing off the high spots off the new little spruce flake, followed by a bit of block sanding to level the wood to the finish in front of the bridge area, followed by brushing the first coat of amber lacquer in an attempt to match the old finish:
The new bit of spruce doesn't have that nice yellowed look because it had been shaded by the fingerboard for the last seventy years, but it does have the same grain spacing and angle of reflectivity so it makes for a much better appearance than the piece I used to patch the full thickness of the hole. Only a bit of it will poke out from under the front of the bridge, and my hope is is that it will look like a stain more than a patch.
The area behind the bridge, along the epoxy trail crack repair and a few other spots where epoxy had been dripped and chipped off also got some new brush "drop filling."
The last bit for today was to level the new spruce I'd glued into the top where I'd harvested that little flake yesterday:
OK, now it's time for a little confession.
Touchup, particularly brushed and filled finish, takes a good long while to dry. In fact, it can take several times longer than a sprayed original lacquer finish because the fill may be twice or three times as thick as a sprayed finish.
So. . .
I waited until the finish touchup had dried for a full month before even starting this blog. Yes, that means the previous "days" were a long time ago, but I thought it would be more reasonable to present the job this way rather than to finish a day and say, "Come back in six weeks for the next installment."
I did touchup work on the cracks and bridge area by brushing, and a bit by spraying, but since it's repetitive and difficult to photograph, I didn't take any pictures of brushing, scraping, sanding and buffing.
I did take a couple of photos of one little bit, though. One end of a long top crack was especially wide and black from contamination, so I decided to pick out a bit of the epoxy and replace it with a little colored stick shellac to improve the look a bit.
Here's another simple little tool - actually a modification of a standard X-acto #11 knife blade. I spent a little time with a fine sharpening stone and ground a little facet on the back side of the blade:
Now the blade is a little chisel that I can drag through the crack backwards, using that flat surface to cut an extremely narrow "V" channel right in the black repaired crack
Stick shellac comes in little bars and is similar to sealing wax. It is used by melting and pressing into voids in the finish:
After leveling the new fill, the crack looked a bit better than it had before:
I have several FRETS.COM articles on neck resetting and fret work, so I didn't take photos of those processes for this job. You can find them on the Big Index Page. The work here went just like those.
At this point the neck is back in place, at the appropriate angle, and I spent the afternoon refretting, first pulling the frets using my trusty soldering iron to provide enough heat to help them release easily:
This what the fingerboard looked like - lots of tiny old chips from previous fret work, and hide glue residue:
After leveling the board, I tapped in a new set of frets:
Once the frets were in, I turned my attention back to the top cracks. They'd been glued with epoxy, and I decided to add just a bit of reinforcement underneath to avoid having the cracks open up if the top received any downward force. Here's one of the little "diamond" shaped pieces of cross-grain spruce I used. This particular one is a bit oversize because it needs to span two adjacent cracks, one of which is only a couple of inches long, quite tight and hard to see in the photo below:
If you click the photo, you can see where I've marked the location of the crack in the big version.
The spruce reinforcement ("cleat") is thinner than the top of the guitar, and thinned at the edges for two reasons. A nice sculpted patch looks better if you should be gazing around inside with a mirror, but more importantly, the thin tapered edges will flex if the top is pressed downward. A short stiff reinforcement is far more likely to pop right off if it gets leaned on.
To be sure I get it right in place, I tape the patch to the bottom foot of a long clamp:
The foot of this clamp swivels, so I used a lot of tape to keep that from happening. the tape wraps around the clamp, with a short section of it sticky side up to hold the cleat.
Then with some glue on the piece, I feed the clamp in through the sound hole, and make sure the top swivel lands directly over the cracks.
Clear acrylic makes a great support for the clamp and allows a good view of the action. That block of plywood in front of the bridge is there to support the back end of the clamp to keep the pressure even and to keep the patch from slipping out of position underneath.
Today was a light duty day - just a few more crack reinforcements with diamond shaped spruce cleats, done one at a time.
Here's one with the same kind of clamp as I used before, but a slightly longer version, and as before, I blocked up the back end with some scrap wood and rubber pieces to keep the clamp aligned nicely:
To reach way down to the end of the long cracks, I turned to an old friend - the first long reach crack clamp I made almost 40 years ago. Not having much resource or ability in metal working, I bandsawed out the shape, and used a regular stove bolt for the screw. I silver-brazed on a special dated knurled knob:
The business end of the clamp has an angled top piece so I can feed it in through the soundhole easily, and the rest of it has a low profile to make it less likely to tip sideways as I'm aligning it. The frame is a full 1/2" thick by 5/8" wide so it's pretty rigid compared to other crack clamps of its length.
Originally, I just had another bolt for the bottom, but a few years ago I upgraded to what I call a "bigfoot swivel" that's siginificantly larger than the usual for this kind of clamp. Now that I'm a wanna-be machinist, I can make those myself.
You can't see the back end, but I have it blocked up to keep the clamp level, of course:
This photo gives a good closeup of the dated knurled knob. . .
A few weeks ago I made a set of four spool clamps. At least that's what they look like:
In fact, I use them, either three or four at a time, as a sort of work stand for guitar repair. They are way oversize, with 1/2" acme threaded rods and two-inch hardwood spools, so they clamp on securely to provide sturdy legs so I can work all around the body of the guitar while it sits solidly on the bench. They are tall enough that I can add regular clamps around the perimeter without having to juggle the guitar or move it at all. That black ribbed covering on the screw is just a piece of split polyethylene tubing sold for covering bunches of computer wires, and stuff like that.
Here, I'm clamping my bridge saddle router mill to the top of the guitar after carefully aligning it to the marks I'd made for the saddle location:
This 1940 replica bridge gets a "through-cut" saddle, and because I want to stay true to the 1940 design, I need to block up one end of the fixture so it will cut a saddle slot that's angled downward on the treble side by .040-.045" just like the original. After a quick bit of calculation, I settled on a 3/16" shim for the bass side:
A couple of quick passes through the bridge, and I had a nice clean slot. Next came reaming, chamfering and slotting the holes for the strings:
My slotting saw is a regular electric jig saw blade, mounted in a Shaker peg as a handle. It cuts on the pull stroke, so I have great control as I work.
Fast forward to the final setup, new saddle, nut shimmed and adjusted, and the job is done:
Brian was the first to give this one a tryout, and he was mightily impressed:
Even though it had spent the last couple of decades in a closet with the damage unattended, this old timer woke up after the ordeal and had a lot to say for itself. Tomorrow, I'll try to get Jack to record us a quick sound sample. . .