| |
Here it is at last, the vise we've been waiting for. Thanks
to Shiraz Balolia, the owner of Grizzly Tools and an amateur guitar
maker himself, we have a reproduction of the original Versa Vise. FRETS.COM
readers have been asking me for years where they could get this versatile
tool, and now I have a coherent answer. |
| |
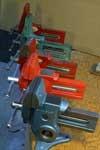
Just for fun, here's a look at my collection of originals:

Original tall form Columbian "Gyro Vise"
|

Original tall form Will-Burt "Versa Vise"
|

Standard Will-Burt Versa Vise
|

"Current" edition Gaydash Versa Vise |
|
| |
Back to the topic at hand. This new Shop Fox Parrot
Vise works just the same as the originals and is a bit better from the
standpoint of fit and finish. This medium duty bench vise rotates a full
360 degrees and the rotation locks as you tighten the jaws, meaning that
the vise itself aligns to the work piece as you clamp it up. I just can't
overstate how convenient and fast it is to use! |
 |
The vise comes packed with a coating of thick grease on the unfinished
parts, so I take some kerosene, naphtha, or paint thinner and remove all
the grease from the inside and outside of the swivel joint. That area needs
to be kept dry so the swivel will tighten well. |
 |
All my clamps and vises get a bit of oil on the other moving parts, especially
the screw. |
 |
I like to mount my vise right at the edge of the bench so I can grip long
things. . . |
 |
Once I have the vise mounted I can adjust the leveling screw under the
moveable jaw. This screw is intended to make the two jaws come up level
when the vise is tightened. |
 |
After adjusting, I tighten the jaws quite firmly, loosen, and readjust
as necessary before tightening the set collar on the adjusting screw. Now,
it is set and likely to remain that way for many years. I don't readjust
the screw when using the vise in the horizontal mode because I don't need
to have the jaws level together in that position. |
| |
The first thing I do when I get a new shop vise is to set
about making a pair of protective jaws so I can clamp instruments without
endangering the finish. I took some 3-1/2" x 5" pieces of 1/2"
plywood and glued on a layer of 1/8" leather salvaged from an old guitar
strap. |
| |
The vise itself makes a handy clamp for gluing up. Any
kind of glue is likely to work well - I used Titebond. Leather really bonds
well to wood using any kind of woodworking glue, so I always use wood for
the jaw inserts. |
| |
Soon as the glue was dry, I trimmed the leather flush with
the plywood. I've used a number of other materials and have concluded that
nothing works nearly as well as leather to grip and hold instruments. |
| |
It's easy to determine the exact shape and size of the
cutout. The width must just enough to clear the vise slide. |
| |
To mark the depth, I simply clamped the pad, top down into
the vise, making sure that it went down against the slide as far as it could. |
| |
I cut neatly down the lines. |
| |
and roughly chopped out the center section. |
| |
This pair of pads will last for years, even though they
are made from regular fir plywood. I have some pads that I made from some
of that solid hard Baltic Birch ply, and they have seen daily use for ten
years. |
| |
Watching from the other side of the room, Mike Gold asked
me if I had planned to do anything about the sharp corners on the Parrot
Vise. Unlike the Versa Vise, this tool has cleanly machined and ground surfaces,
leaving some pointy corners and sharp edges that could really damage an
instrument even at the slightest touch. |
| |
It took me about two minutes with my meanest old double
cut file to round over all the sharp corners. |
| |
A mighty simple simple precaution - thanks for noticing,
Mike. |
| |
I clamped up one of my new plywood pieces and used my old
Stanley #60-1/2 low angle block plane to round over the back side. |
| |
Back in the vise, you can see I have about 1/8" clearance
at the ends. Later as I started to use this vise, I discovered I'd rather
have closer to 3/16" at each end, so I increased the arch on the back
of that pad. By then I'd put away the photo gear. . . |
| |
Because I work in a shop with four similarly fitted up
vises nearby, I can borrow the pads from another. If I had only one vise,
I'd have made three jaws, so I could switch out the curved one when I worked
with flat items. With the curved jaw in place, I get a fantastic grip on
a tapered neck. |
| |
Flipped to the sideways mount, the vise hold a neck
or whole instrument vertically with ease. If I'm working with raw wood,
metal or plastic items, I may take the jaw protectors out, or I might
use them backward with the wood faces against the work. Notice that I
mount the vise right at the front edge of the bench to get good clearance. |


