|
|
Neat and trim as it looks, celluloid or plastic binding
has a tendency to shrink with time as plasticizers evaporate from the material.
As with other aging processes, binding shrinkage is accelerated with heat.
Sometimes, we see binding become drastically loose after only one day in
a hot parked car. |
|
|
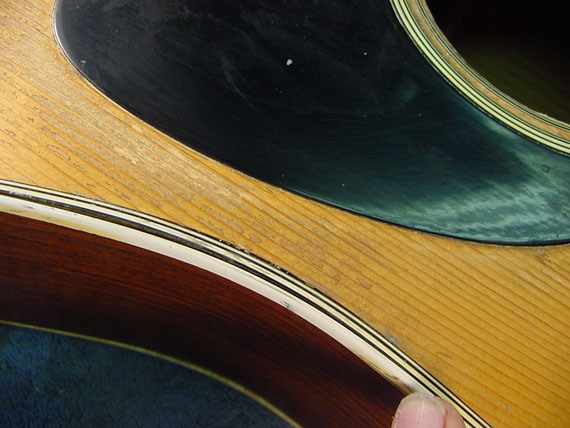
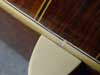
On this Martin D-35, the binding has shrunk enough that
it's pulled away a the waist, as it tries to strike a straight line between
the upper and lower bouts. It's so loose and shrunk that it can't be stretched
and glued back in place. One section of the back binding is broken at the
waist where a previous repair person tried and failed to get it back where
it belonged. |
|
|
So, nasty as this job is, at least it makes for a good
discussion of regluing body binding "the right way." I use quotes
here because there's often more than one way to do things correctly. This,
I believe, is the conventional complete repair. |
|
|
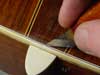
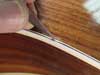
Here, and in the photo above, I'm using my thin palette
knife to loosen the binding all around the body. That way, I can release
it at the ends where it tucks under the fingerboard so I won't have to make
patches right in the middle of the side somewhere when I reglue the binding.
Remember it is considerably too short at this point having shrunk so much. |
|
|
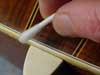
OK, a little wiggle, and pull. That's all there is to it. |
|
|
D***! It broke at the last second! Well, that's the way
it goes. Now, I'll have a little patch to add on this side. Maybe the other
one will work more easily. Unfortunately, the binding is short enough now
that if it breaks on either side, I can't simply move the entire top binding
around to reach. So, even if I break only one side, I usually have a patch
to add. |
|
|
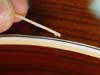
On the bass side, the purfling is just as loose and shrunk
as the binding, so I'll loosen them both completely. Just to avoid as much
finish damage as possible, I'd leave the purfling intact if it hadn't pulled
away at the waist. Purfling is not strong as the binding, and doesn't usually
have the ability to pull away from the body on its own. |
|
|
Now, that's the way it's supposed to work! |
|
|
As I worked my way around the top I'm very careful not
to pull strands of the spruce loose from the top. Look under this piece
of binding. You can see thousands of teeny spruce filaments stuck by the
original solvent glue. |
|
|
I'll be gluing the binding back with regular carpenter
wood glue rather than the original solvent glue, which would eat up any
finish it touched. So, I clean up the slots to accept the binding in its
new, slightly shifted location. |
|
|
With my sharpest little chisel, I scrape the channel clean
all around, again being careful not to disturb the finish on the top or
side of the guitar. In this picture, you can see that the top purfling binding
came loose but the side binding is intact. |
|
|
Some nice wood glue. |
|
|
And a lot of tightly pulled masking tape to hold the binding
in place. |
|
|
Here's the "good side" all back in place. I'll
deal with that gap on the treble a little later as I work with the other
gaps in the back binding. |
|
|
This is that spot I mentioned earlier, where the previous
repair left a break in both the binding and purfling. I don't know what
glue was used, but this spot is really nailed down. I'll leave it that way,
and loosen the rest of the binding. Of course, I'll also have a couple of
small spots to fill here. |
|
|
Around the back, the binding comes loose much more easily
because there's little chance of splitting pieces of the rosewood loose.
It's a much stronger wood than either mahogany or spruce, so I can speed
right along as I loosen the binding. |
|
|
Regluing the back binding goes the same way as the top,
so I thought I'd show these clamps, which can give a bit of extra clamping
pressure at the waist area. These are the Berna
Assemblers, and you'll find an article about them in the Tips &
Tricks section here at FRETS.COM. |
|
|
They're virtually weightless, they have squishy jaw pads,
and they can cram in closely, making them ideal for regluing binding at
the waist where masking tape might not be strong enough to hold the stiff
plastic in precise alignment. |
|
|
See how nicely they hold. |
|
|
Here's the predicted gap on the back binding. For whatever
reason, the back binding didn't shrink as much as the top binding, so the
gap is quite small here. |
|
|
Time to go"binding diving" in the old scrap box. |
|
|
I soak the end of a matching piece of binding in acetone
for a few seconds to make my binding welding glue. |
|
|
I can scrape a bit of this soft goo off with the blade
of my small palette knife and use it as glue to adhere the new and old binding
together |
|
|
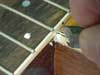
A little plug of new binding in the gap by the treble side
of the fingerboard. It will take quite a while for my white acetone putty
to dry all the way through, but the color match is worth the wait. |
|
|
To fill the tiny gap in the purfling, I can save a bit
of time fitting the piece by making a little spear of matching purfling. |
 |
A drop of acetone on the point of the spear, quickly shaken
off, is enough softening to allow me to weld it into the hole. I'll clip
off the excess and allow the spot to dry for a day or so before going on. |
 |
Now, I can scrape the plug level. |
 |
And trim off the extra binding and cement. |
 |
Looks pretty clean, but the color is still a bit stark
because there's no finish on the binding. |
 |
After brushing on some amber lacquer, leveling and polishing,
this repair will be complete. My amber lacquer is the sun-darkened
stuff I describe in the Quickies section of FRETS.COM. |
 |
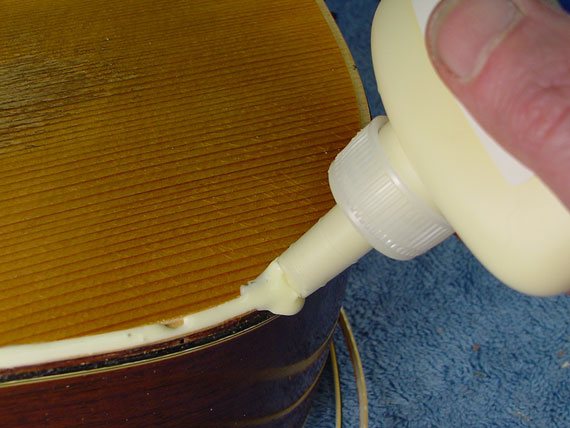
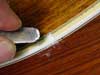
Here, at the gap in the waist, I figure a bit of the acetone
binding putty will be enough to fill the gap successfully. It's a tight
spot, and it's pretty irregular. |
 |
So, I just butter it up, including the purfling. |
 |
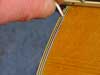
Same technique to level the binding - a razor blade protected
with tape to avoid scratching the finish. |
 |
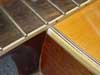
A relatively clean job, but a piece of the black purfling
is missing. |
 |
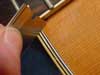
Same thing happens at the heel, where I choose to inlay
a single piece of white binding. Trying to fit in such a short piece of
a black line would test anyone's ability to align the pieces, so I skipped
that altogether., |
 |
Instead, I'll incise a line right across the gap, bridging
the two black segments. Widening the line into a V-groove, I can control
its width and make sure things line right up. |
 |
A quick application of black dye from my "Sharpie"
pen, and the line is complete. I'll do the same at that little waist area,
too. |
 |
Applying a seal coat of shellac, I just touch the spot
in a swinging motion, so I don't drag the color out of the groove onto the
white areas. Now I can brush on a bit of lacquer to fill the area and touch
up the color. This job's done. The binding fit back on nicely and there
was little damage to the yellowed lacquer, so all I have to do is "drop
fill" with lacquer around the perimeter where tiny chips came off during
the removal process.
|
| Here's a quickie. Often, as on this different
D-35, the binding is very slightly loose and can be pressed right back in
place. |
 |
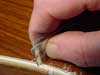
In a tiny waist segment like this, I can take a little
drop of thin cyanoacrylate and drop it into the crack. |
 |
Most of the time, the drop runs right in, and I can give
it a quick wipe, and clamp up the loose section with those plastic Berna
Assemblers. After it dries, the cyanoacrylate can be leveled and polished
just like lacquer, and the repair will be nearly invisible. |
 |
If the drop won't run in, I simply stab the gap with my
pointiest knife blade. Then, the crack opens, and the glue goes right were
it's supposed to go. This procedure is especially effective for fingerboard
binding. |
|
Sometimes, I'll refinish the entire
binding after replacing sections, or where lots of finish had chipped
off the binding, either in normal use or during repair. Generally, this
is a problem only with the "modern" white binding made of ABS,
PVC or other plastics that don't allow perfect adhesion of nitrocellulose
lacquer. Since celluloid and nitrocellulose lacquer are so similar, the
lacquer hardly ever chips off celluloid binding.
|
|
|
I'll scrape the finish off all the binding
of this 1974 D-28, working slowly around the entire instrument. I use my
thumb and fingers as guides to avoid having the scraper blade dig into the
finished areas over the wood. This guitar has "Boltaron" binding,
which I believe is either ABS or PVC, and to which the lacquer does not
adhere very well. That means my scraping job will be easy as the lacquer
breaks of in chips all around. |
|
|
Masking is as important here as anywhere, and I try to
run the tape almost up to the edge of the binding. Even though the finish
will be leveled later down to the height of the original finish, I like
to have about 1/64" of finished wood showing beyond my masking line.
That way, I'll be sure to fill any little chips and get a good line of adhesion
all around the body. |
|
|
I use the wide sign makers transfer tape to mask the broad
surfaces. It clings everywhere so it does a neater job than paper or plastic,
and I can handle the guitar easily. I'll make sure my first spray coat has
a lot of lacquer thinner and a bit of retarder thinner to help it "bite"
into the binding as well as it can. |
|
|
After spraying a full finish of my aged amber lacquer over
a period of about 3 days, I take off the masking and allow the finish to
dry for a couple of weeks. It's important to realize that even though it's
only on the binding, it is a full thickness finish, and it requires the
same drying time as an entire instrument would. A bit of naphtha cleans
off the masking tape residue. |
|
|
Then, it's on to scraping with my taped razor blade, so
I don't scar the original finish as I level the finish on the binding and
reduce it to the thickness of the surrounding original. |
|
|
A light sanding with 800 grit nonloading sandpaper, and
I'm ready to buff. If everything went as it should, the guitar will look
just about as though it had never had finish damage over the binding. |