Reproducing Vintage Bridge
Pins Please
click the small image to see the big one
© Frank Ford 2006;
Photos by FF
From time to time I make reproductions of 19th Century Martin bridge pins, which are a bit different in size and shape than today's standard bridge pins. Those old pins typically have a much larger head - just about 3/8" diameter, and were often made with a round abalone inlay ringed with white mother-of-pearl.
My lathe is a clone of the famous "Hardinge" toolmaker's lathe, and as such, is pretty much state-of-the-art, circa 1950. No computer controls, but a good precision tool.
I used the best quality ebony I could lay my hands on. It came from Sri Lanka and it is a grade usually referred to as "bow frog ebony," meaning that it's the hardest, blackest, and most dense possible. I obtained this wood from Luthier's Mercantile in 1-1/2" by 1-1/2" by 18" pieces around ten years ago. In order to handle it on the lathe, I cut the wood to a 3/8" square cross section so it would fit my 3/8" square collet.
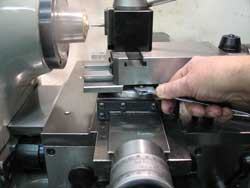
The original pins had a five degree taper, so I set the compound slide on my lathe to 2-1/2 degrees and locked it in position:
By cranking the slide in toward the headstock of the lathe, I was able to cut a perfect five degree taper.
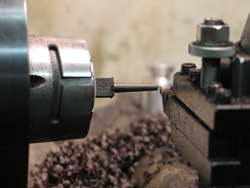
I chucked up a length of the ebony, and started to turn a taper on the end:
After I finished the taper section, I cut the piece off leaving a bit to
make the head, pushed the ebony out some more, and cut another section,
and repeated the process until I had a bunch of nice bridge pins with big
square heads on them:

After all my pins were roughed out I replaced the collet with a blank brass "ememrgency" collet, and with the compound slide still set at 2-1/2 degrees, I bored out the collet to a matching five degree taper. This brass collet would now be able to hold the bridge pins for the rest of the operations:
Once I had the tapered collet, I was able to put the pins in for each operation, take them out, and replace them with good accuracy. In order to finish the heads, I would have to do a number of different cuts, and I didn't want to have to change cutters for each pin. Here, I've turned that square end round as a preliminary stage:
Next, I'd have to form the "button"head on each pin, and I wanted them all to come out exactly the same in size and profile. So, I set about making a "form tool." This tool would have exactly the same shape as the head of the pin, but in reverse. I used a piece of 1/4" square high speed tool steel and shaped it with my little hand grinder and a carbide cutoff wheel.
It took a while, but I finally got the tool to fit around the original bridge pin exactly:
Now, each pin went back into the tapered collet as I ran the lathe up to 4000 RPM, and fed in the form tool to shape the head:
As you can see, the tool not only formed the profile of the bridge pin head, but it also cut off the excess length at the same time.
Into the collet again, each pin got an introduction to a five millimeter brad point drill bit:
That drill made a nice flat bottomed hole for the mother-of-pearl inlay.
I glued a white pearl inlay into each bridge pin and set them all aside to dry overnight:
I gave the pins another ride on the lathe, this time to drill the center of the pearl inlay with a four millimeter drill:
Without that tapered collet to hold the pins, I'd probably never have been able to keep everything on center, and with this inlay, any error would show easily.
And, into that new hole, I glued a four millimeter abalone dot inlay:
Here's part of the batch of pins, each with its ringed pearl inlay:
The last time on the lathe was for cleanup. I used a regular fine cut file to level and round over the inlaid pearl and abalone:
And, some 400 grit sandpaper to smooth the entire head:
The final bit was to give each pin a really good shine on a high speed buffing wheel with some black metal polishing compound. The grit of the compound polished everything nicely, and the wax binder in the compound provided a fine wax coating:
The completed pins are pretty much indistinguishable from their original counterparts: