Please click the small image to get the big view
Couldn't resist calling it
Jack the Gripper
© Frank Ford, 2007; Photos by FF
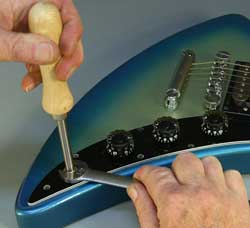
Here's a little tool I've been working on lately. It provides an easy way to grip the inside of a guitar output jack so the nut can be tightened without having access to the inside. For this illustration, I saved unscrewing and replacing eleven screws that hold the pickguard and jack assembly in place:
Here's how it works. The rod terminates in an eccentric shaft, with an eccentrically drilled knurl on the end. Turn the rod either direction, and the hardened steel knurl bites right into the side wall of the jack, holding it securely:
The tool is now available from LMI, and from Gryphon.
Last week I set about making up the first hundred of these little tools.
I cut off lots of sections of 5/16" drill rod for the shafts, using my little band saw gravity feed v-block and a stop:
Because both the shaft and the knurl needed to be offset by .015" I made up a pair of lathe collets to accommodate 1/4" and 5/16." I set the emergency collet in a collet block, centered it on the mill, and offset the X-axis by .015, drilled and reamed:
I made one of brass and one of steel, because those were the only two emergency collets I had at the time.
After turning a bit more than half inch of the shank to 1/4" diameter, I chucked each shaft in the offset collet, and turned the eccentric to 1/8" for about .300" of its length:
I made up a little fixture to cross drill the eccentric shaft for a retaining pin. First, I used a #30 drill to make a hole in the end of a piece of steel:
Then without moving the Y-axis on the mill, I turned and reclamped the block so I could be certain that my 1/16"drill would go directly through the center of the end hole. After I cross drilled the block, I stuck in each of the shafts and drilled the end:
Thanks to having taken the time to make up that little fixture, I had 100 nice little holes right at the end of 100 shafts:
The most challenging part of this project was to make up the little knurls. I set up my cutoff slide on the lathe, calculated the length of the knurled part I'd need to make, and milled up a little measuring stick to make it quick and easy to feed through the right amount of stock:
Some of these pictures were taken at a second "session." Here you can see a cardboard box I clamped in place to catch the knurled pieces as they were cut off, after I got tired of chasing the first batch:
And, this is my improved measuring device, a pair of pliers ground to the right thickness so I could pull the stock, and butt it up against the cutoff tool:
I have a tailstock mounted knurling tool. Actually it's a turret tool, but I made a simple holder so I can use it in the lathe tailstock. I ran the tool in until it touched the rotating collet and made some very nice little knurls on some O-1 drill rod:
To fit into a 1/4" jack, I found that I had to use a drill size B rod because the knurls expand the diameter to just about .247" in this operation.
A quick plunge with the cutoff slide, and another one was done:
To get enough clearance for the knurling tool, I made some spacers to mount the cutoff slide attachment outboard by about a tenth of an inch.
Here's what they looked like so far:
One of my absolute favorite power tools has been my little Rockwell 1" x 42" sander. For years it was also my only grinder. I made a little fixture to help me debur and knock the ends off the knurled parts:
For the second, larger batch, I made a multiple part holder:
And, I used the six inch belt sander to do a big batch at a time:
I stuck each knurled part into the 1/4" eccentric collet, and drilled it with a #30 drill for a nice loose fit on the 1/8" eccentric shaft:
The little knurled pieces were easy to insert into the collet, but really difficult to take out, so I simply let them push through as I inserted another on top of the one I just drilled:
With a cork in the left end of the spindle, I had no problem containing the mob:
I'd thought about having a little chute to let them fall into a bucket, but decided my batch wasn't big enough for that bit of complexity.
To debur the holes I gave each one a quick taste of a ninety degree countersink spinning in the drill press:
Heat treating was, as usual for me, a casual affair. I just heated the knurls with my propane torch until they got bright orange:
And, dumped them in a can of old motor oil:
After I did a couple one at a time, I made a new little nichrome wire holder and did 'em in batches of five. Here's the result:
Assembly was straightforward, just a little 1/6" roll pin through the hole at the end:
I bought a few boxes of simple little file handles from McMaster-Carr, drilled each to 5/16" an inch deep and tapped the shafts in place with a few light blows:
Then, I hit the end one more time with the handle balanced on my little stamp:
Each one is now branded:
I milled up a quick little holder from a scrap of acrylic so I could center them easily on the drill press:
That made it easy to drill for another 1/6" roll pin to secure the shaft to the handle:
Here's the finished deal: