

Remembering Rickenbacher Click
the pics for big shots
Horseshoes
© Frank Ford, 2010; Photos by FF
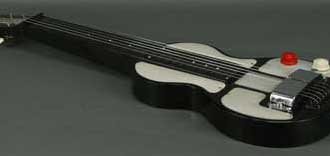
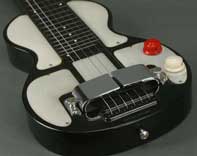
Here some views of a classic 1930s Rickenbacher "lap steel" guitar:
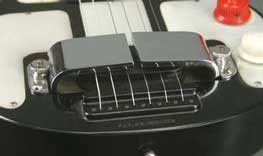
Notice the big chrome pickup assembly - here it is, up close and personal,
taken out of that very instrument:
(Note to self -- no more red towels in photos!)
One of the very first practical electric guitar pickups, it's "powered" by a pair of big flat chrome plated U-shaped magnets that surround the pickup windings, pole pieces and even the strings themselves. The upper sections of the magnets also act as a palm rest for the player's picking hand.
Some months ago, a Gryphon customer, friend, and super guitar player, James Williamson (of Iggy and the Stooges) said he'd been talking to Jason Lollar, who makes guitar pickups in Washington. He'd asked Jason about making him some reproductions of those first Rickenbacher pickups for a guitar project he had in mind. Jason said that the person who made the horseshoe magnets had quit doing them, and that he didn't know where to get more made.
James asked me, "Hey, you've been getting into metalworking lately, how about trying to make those things for Jason?" I already knew Jason and it seemed a likely project among friends, so I agreed to give it a try.
Jason sent me the drawings and an analysis of the old steel, which turned out to be very close to O-1 tool steel, so I figured I only had to order some stock and start bending it. After a few weeks of trying different ideas, and a number of fits and starts, I came up with a pair of viable bent horseshoes. Then I did some reading about making high strength magnets in the 1920s, and found that they needed to be "full hard - brittle as glass." I heated my first prototypes up and dunked them in oil to harden them the best I could in my offhand home shop manner. I sent the pair off to Jason and he reported that they magnetized well, looked good, and that I should get ready to make a few "real" sets for the first batch of pickups.
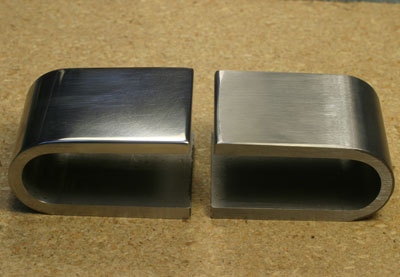
Here's that first pair, the one on the left all polished and ready for plating:

They're 1-1/2" wide, 3/16"thick, 2-3/16" long, and bent to a 3/8" radius.
I start by cutting 5-1/2" long blanks of O-1 steel stock, using my gravity feed on the bandsaw:
Then, a quick deburring of the cut ends:
It takes a lot of force (by my standards) to bend this stuff, so I drill a 1/4" fixturing hole in one end of each blank:
And, chamfer it a bit:
I posted this next picture so next time I make some I can remember the dimensions. . .
I'd made the first trial bends on the Hossfeld bender at TechShop in Menlo Park, but since I'd need greater control of the process, I decided to make a dedicated bender of my own.
This is my bender:
The main part of it is a hunk of 1018 steel I had left over from some other project, and I mounted it on an aluminum plate I could screw to the mill table. In my small shop, the mill table is the only solid surface on which I can fasten this bender and be able to swing the five foot lever I need to accomplish the bend.
The bending arm in place:
OK, here's how it goes. First I put in my blank, and secure the end with a dowel pin and a steel cap over the assembly to keep the blank in place if I should let up pressure on the lever as I bend:
Another shot of the secured end:
Now, I'm bending the piece, after having moved a few tools out of the way:
And, just before I hit the lathe, the bend is finished:
For my first real batch of these horseshoes I used Starrett precision ground O-1 stock, and the bends all went quite well, working cold. Then I made the tactical error of looking for a cheaper source of O-1, and when I tried to bend it, I had close to 50% breakage. Even after having the steel annealed at the local steel treating plant, they still tended to break when bent cold.
So, for them, I worked out a little routine to heat them a bit before bending. I used my Magic Arm to hold a blank in the flame of my small propane torch:
Then, for each bend, I'd take the blank out, and replace it with another that would heat while I bent the first one:
I think it was about 400 degrees Fahrenheit by the time I actually made the bend, which went a bit more easily than when the steel was cold. Breakage was no longer an issue:
I've just finished my third batch of bends, and I'm back to using the Starrett steel, working cold. I save enough time to easily pay the cost difference, and since that's all built into my price, I think it's the way I'll continue.
A bunch of horseshoes:
Next I cut the extra length off, elmininating the bit with my 1/4" fixturing hole:
Notice the bend is pretty nice, but there's still a bit of flare at each edge:
In order to set them in the mill vise and get them milled to precise length, I give them each a light pass on the belt sander to round and flatten that curve evenly:
Then with a piece of rod in the vise, I set them two at a time in the mill vise and trim them to length:
Another quick deburring:
I made up this little bending gage, with a turned section on each end. The smaller diameter goes into the part, and I squeeze the vise until the gage is clamped:
Then I release the part, and check with the larger diameter:
That way I get my bends within about .010" - close enough for jazz.
Alright, back to the belt sander to true up the edges a bit. I want them to be roughly parallel and reasonably flat:
To support the horseshoes for drilling and tapping, I made up a simple fixture from a piece of tropical hardwood:
I'm not sure what the wood is - it might be a scrap of pernambuco.
Anyway, here's how it sits in the vise:
Wiht a little work stop set in place and the table locked in position, It's quick work to drill the parts:
I used my hand tapper for this particular batch, but I tapped directly on the mill for the next run:
Back on the mill for a second through hole:
From this point, it became important not to let the pieces bang into each other in boxes or whever, so I kept them hanging on a simple support - a piece of 1/2" plywood clamped in my trusty Versa-Vise:
Standing at the 6x48 belt sander, I proceeded through 120 and 240 grit sanding of the portions that would be visible when the pickups were mounted. Note the angled board I have clamped to the table - it's there so the start of my sanding would be just a bit below center. As soon as I touched the sanding belt with the part, I tipped it up, gently evening out the curve and flattening the top:
For sure, I could have simply tilted the belt sander table, but I find two advantages to using this kind of board - I can mount the board so that it actually touches the belt, reducing or eliminating the tendency for thin items to be sucked down between the table and the belt, and the wood platform is a bit more "friendly," so my part doesnt' slip around, or get scratched easily.
Moving to the 1x42 sander, I used a 400 grit belt to round over sharp edges and corners, and to get the rest of the exposed surface ready for buffing. To avoid deeper scratches, I removed the platen from the sander and backed up the belt by hand, with a piece of soft leather:
Ready for buffing, and you can see how far around the polishing will extend:
I took advantage of the drilled and tapped holes to mount the parts on a 1"wide steel handle, so I could lean into the buffer with some assurance I wouldn't turn my horseshoe into a missle:
Next, it's that 15-mile drive to Byington Steel Treating in San Jose:
A family business started in 1952, it occupies most of a city block in this industrial part of town.
The furnaces operate 24 hours a day, every day, and Byington offers overnight service on all jobs:
Here's a sample from my batch, getting ready for hardness testing:
All in all, a fine local business with a helpful and friendly staff.
They have some cool neighbors, too:
Finally, the batch is done and ready to send off to Jason!
Here's the final product after Jason had the "horseshoes" chrome plated, magnetized them, and basically did all the real work of making the pickup:
My light blue towel is much better as a backbround for the photograph, too. . .